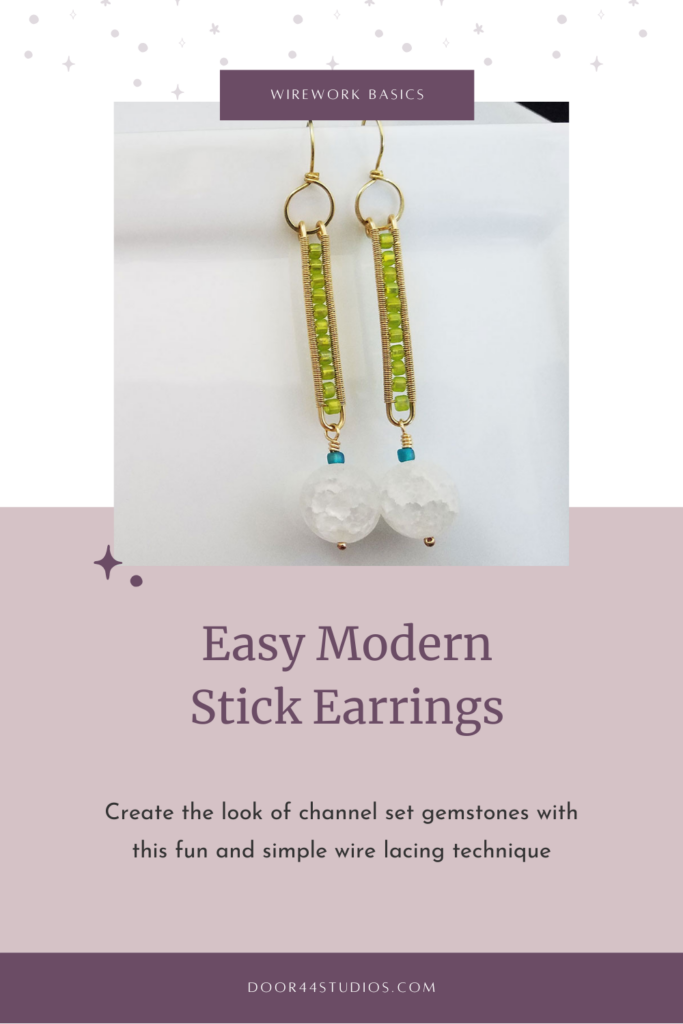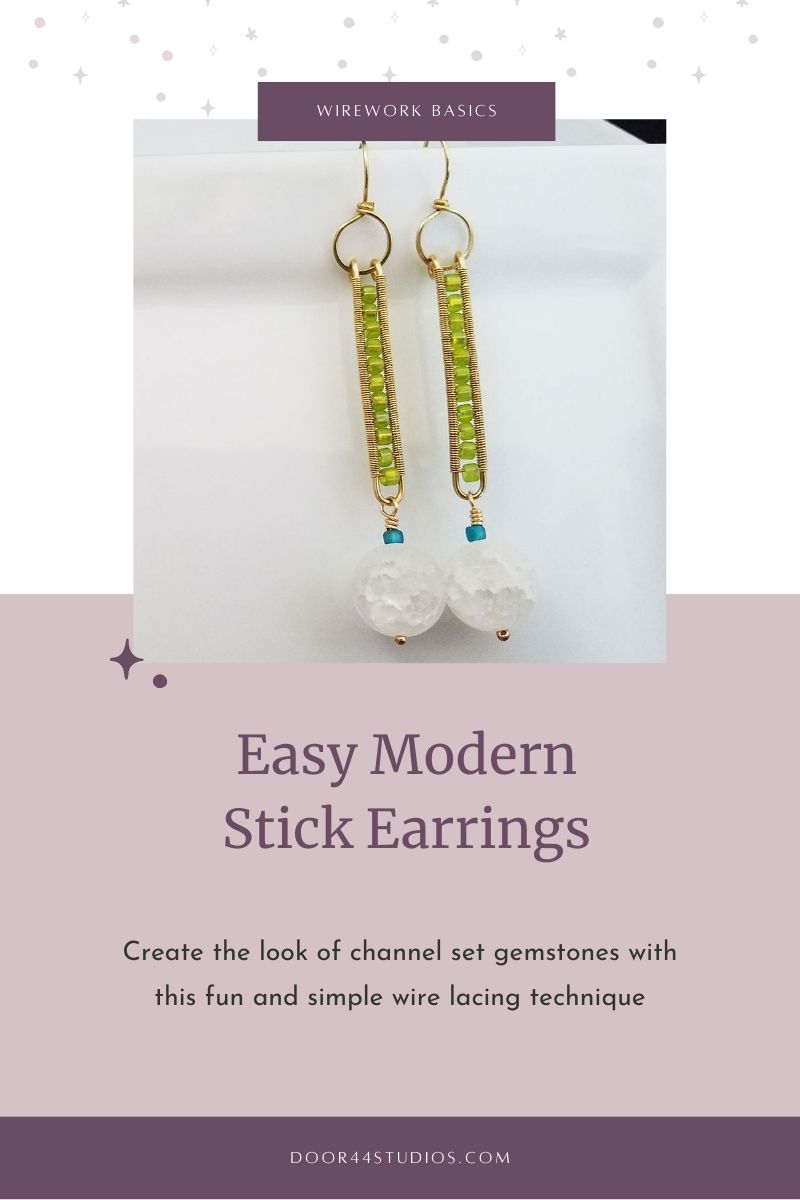

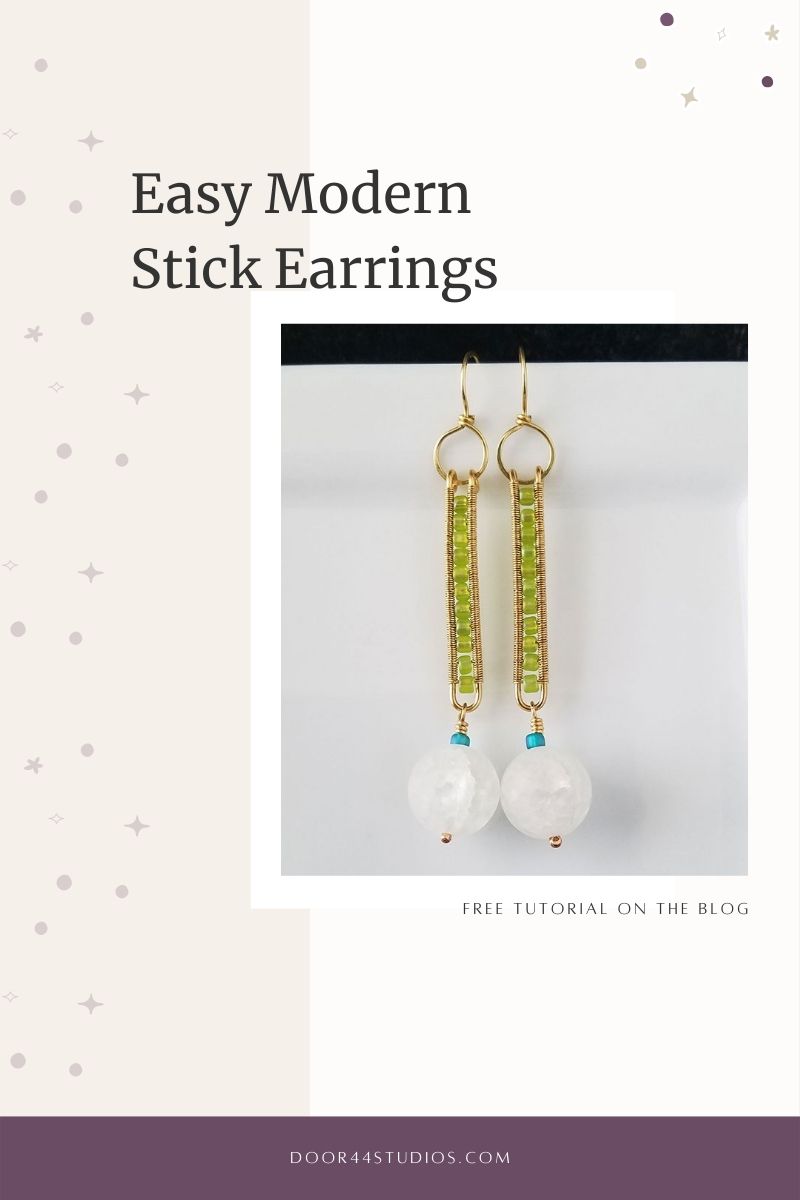
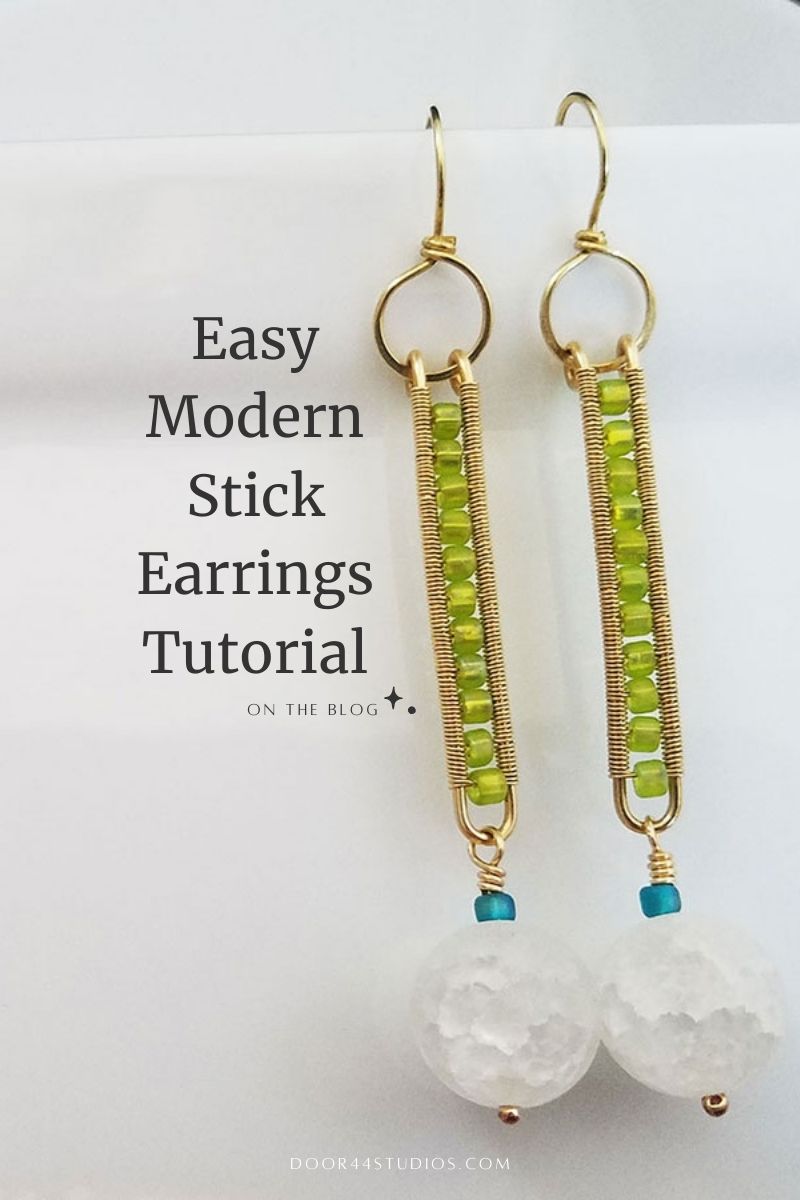
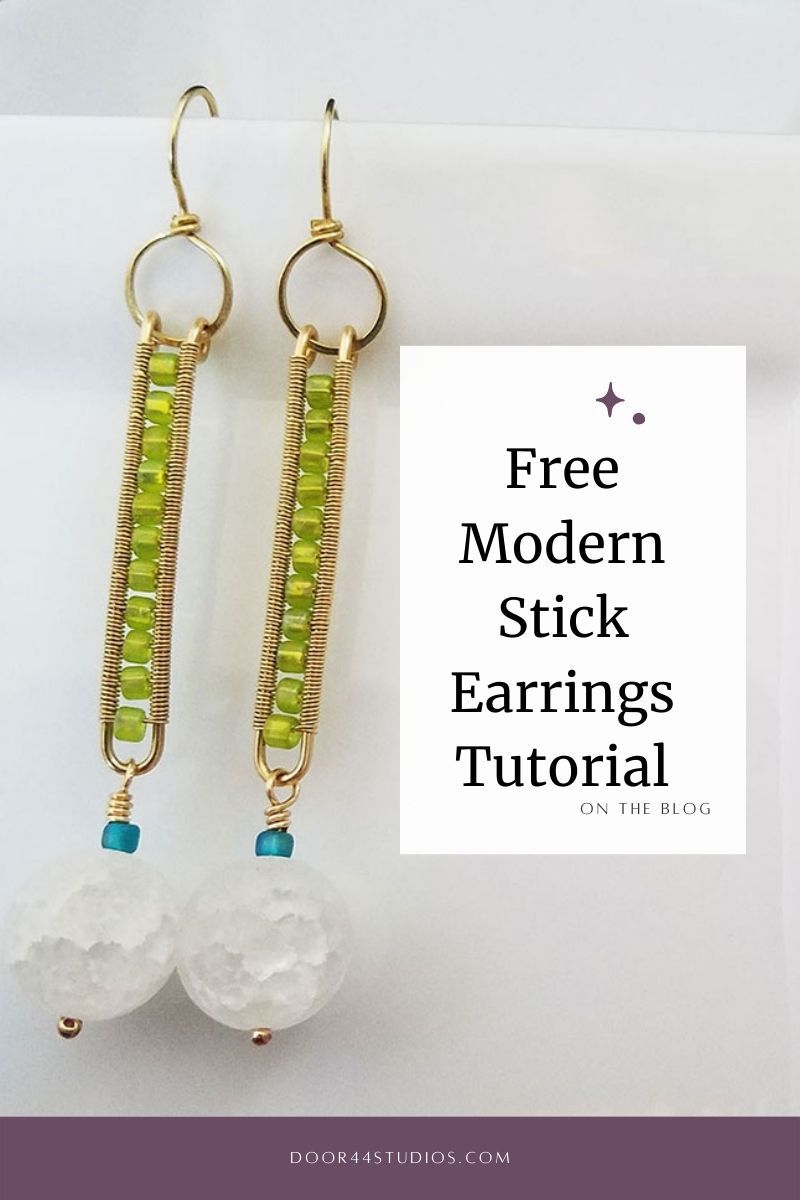
Hey there, jewelry maker! Have you ever wondered how to get the look of channel set gemstones without having to fiddle with teeny, tiny cabochons and complicated wire wrapped settings? If so, you’re going to love these easy modern stick earrings. We’re going to use beads to mimic the look of channel set gemstones. Let’s get started!
Copyright & Disclosure
You’re welcome to make and sell products from this tutorial. When it comes to my written tutorials, however, I reserve exclusive rights to all images and written content. You may not reproduce or redistribute any portion of the Easy Modern Stick Earrings tutorial in any way, shape, or form.
This copyright applies to the printable PDF version of the Modern Stick Earrings tutorial as well, and it will be included therein. You may share the free version of this tutorial only by linking directly to this page.
This post may contain affiliate links. If you click on a link and then make a purchase, I may earn a small commission (at no cost to you). As an Amazon Associate I earn from qualifying purchases. To learn more, please see my full disclaimer.
This is a basic wirework project that can be achieved by someone who has never worked with wire before.
Because there’s a full video tutorial for these earrings, I don’t go into a great deal of detail here on the blog. Experienced wire weavers will have no trouble following along with this abbreviated written tutorial. If at any time you get stuck, be sure to watch the video tutorial here. Or be on the lookout for the much more detailed written tutorial, which will be available soon.
Getting Started
For best results, use solid copper, sterling silver wire, brass, or bronze jewelry wire. We’ll harden the wire while we work, so you can use either dead soft or half-hard wire for the frame wires. I always recommend using dead soft wire for wrapping or weaving.
Because we won’t be doing a lot of hammering in this project, and because the cut ends of the wire are hidden, you can also use filled wires for these earrings. They will look absolutely stunning with gold-filled wire and faceted gemstone beads.

Tools & Materials

Finished Size
- WIDTH: about 1/2 inch (1.27 cm) – This dimension varies depending on the size of drop bead that you choose and the size of loops you make on your ear wires
- LENGTH: about 3.25 inches (8.26 cm)
Instructions
If you prefer video tutorials, watch the video version below. Otherwise, keep reading for the written tutorial.
The instructions for these earrings are written for the 3-1/4-inch earrings featured in this post. However, you can change the size of your finished earrings by adjusting the length of the beaded sticks and/or the beads that you choose for the beaded dangles. You can also make the loops on the Modern Big Loop Ear Wires any size you like.
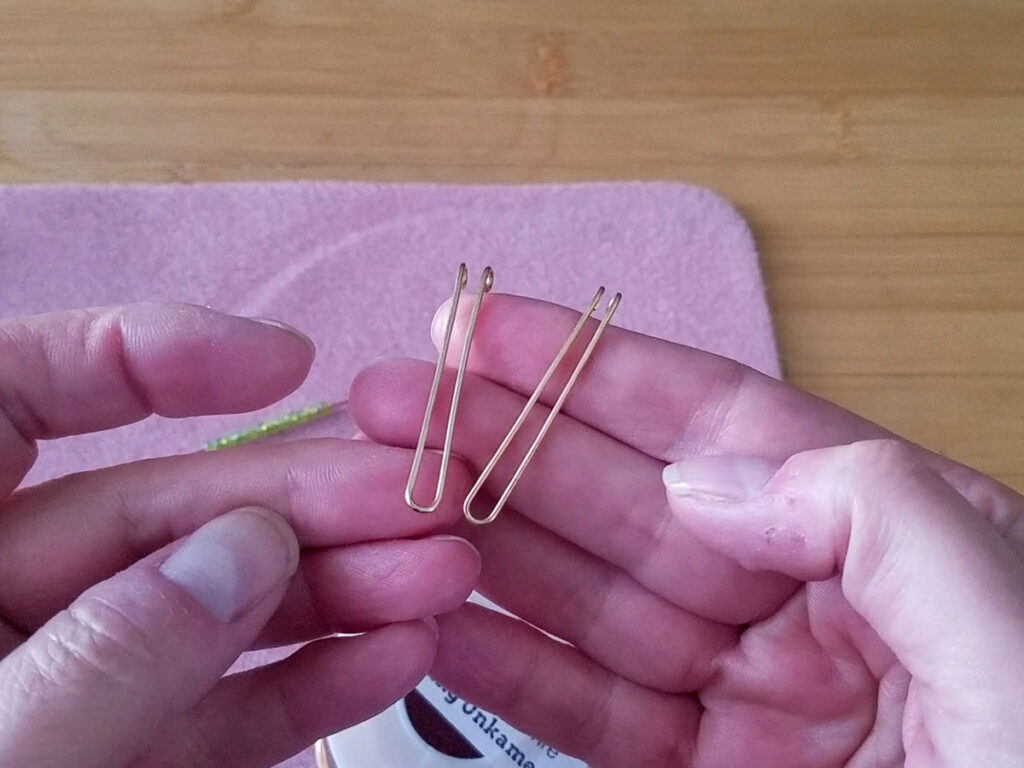
Prep Your Wires
Measure and cut two 4-inch pieces of 18g wire. Then mark the center point on both wires. This is where we’ll create the bend for the beaded sticks.
Remember, four inches is enough wire to make sticks up to 1-1/2-inch long (3.81 mm). If you want longer sticks, add some extra length to your wires.

Shape the Oval Sticks
Use the 3mm step (the second to smallest step) of your bail-making pliers at the center marks on your wires to shape the wires into a long “U” shape. Make sure the wires are parallel to one another and that the ends are even. Trim as needed.
Next, use the 2mm step (the smallest step) of your bail-making pliers to form simple loops on the ends of your wires. These loops will attach to the ear wires. When finished, your frame wires should look like those pictured below.
Bead the Stick Frames
You’ll need 10-12 beads per frame if you’re using 8/0 seed beads for this project as well as 3.5 feet of dead soft 28g wire for lacing.
Thread one bead onto your lacing wire and place it at the center point of that wire. Then lay a bead frame over your bead with the front face up, as shown.
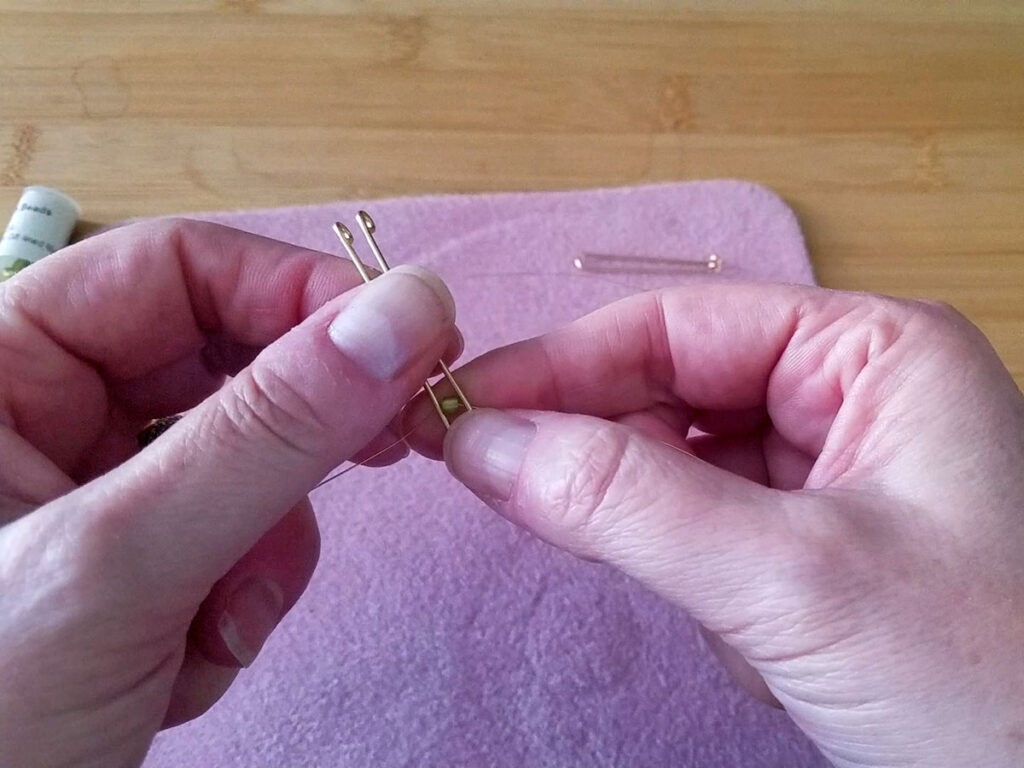
Next, thread one end of your lacing wire across the front of the frame and through the bead. Make sure that the wire comes out on the front side of the frame. Then repeat with the other end of the wire.
When you’re finished anchoring your first bead, you’ll have three passes of wire going through the bead, and the lacing wire will wrap from back to front, as shown. Notice that the wire loops look a bit like a bow when viewed from above the bead.
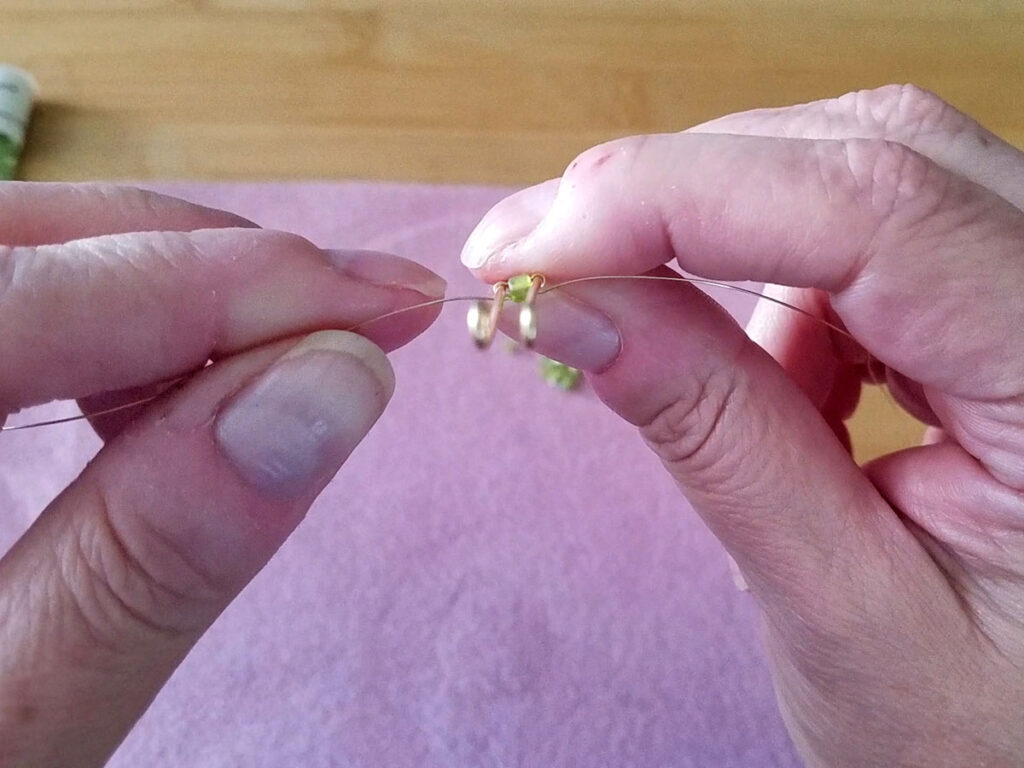
The rest of the lacing process is easier because we’ll only be passing through each bead twice from now on.
Coil each length of your lacing wire 6-8 times around the frame. These coils will create a gap between your beads. You want enough coils that the beads stack comfortably without crowding one other, but not so many coils that you end up with big gaps between the beads. The number of coils may vary depending on the beads that you choose, so do take some time to figure out the right number of coils for your particular beads.
At this point, both of your lacing wires should be laying on top of the bead frame and pointing out away from the center of the frame. Now thread a bead onto both wires with the left-hand wire flowing from left to right and the right-hand wire flowing from right to left.
Carefully pull the wires taut until your bead slides into position above the first bead. Your wires should be behind the stick frame at this point, and your bead may be sitting a bit deeper in the frame than the first bead. Here’s how you get that bead aligned in the center of the frame: Gently slip your lacing wires to the front of the frame between the bead and the frame wire and pull firmly to remove any slack in the wires.
Now just repeat that process by coiling the lacing wires around each side of the frame and adding another bead. Remember, each bead is added to the back of the frame, and then the lacing wires are pulled to the front before adding more coils.
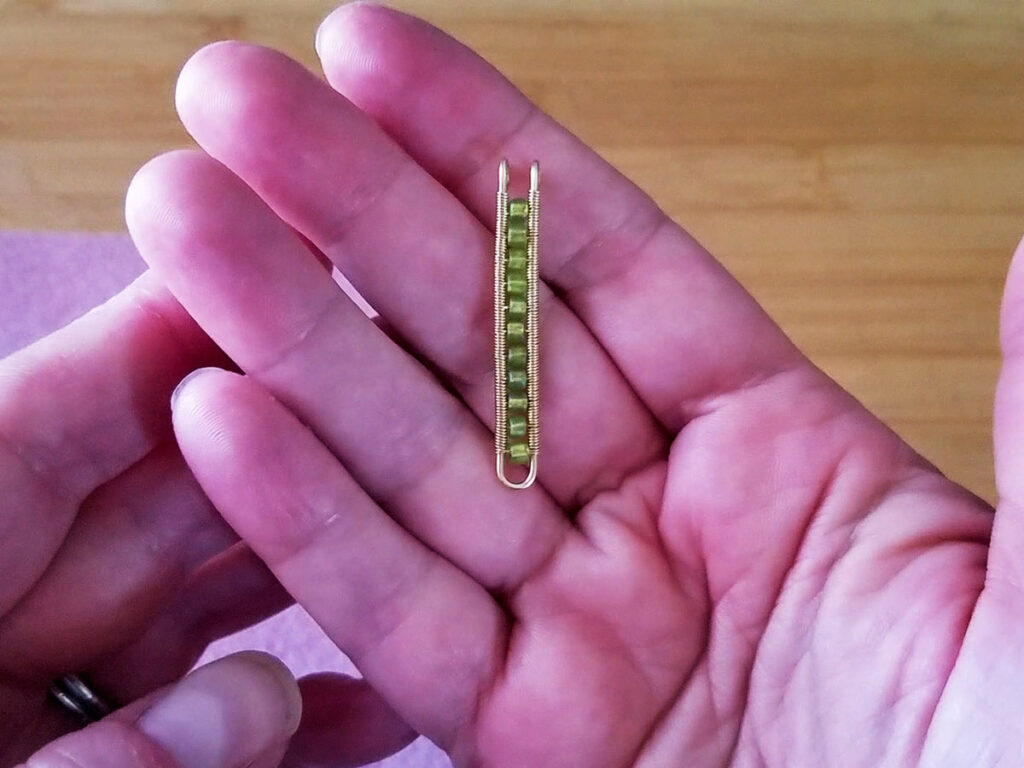
Continue adding beads until you reach the bottom of the simple loops you made at the top of your stick frames. To finish off the lacing wires, coil them snugly around the frame until you reach the simple loop. Then break your lacing wires off so that the end is laying on the inside of the frame.
When finished, your beaded sticks should look like the one shown below.
Attach the Ear Wires
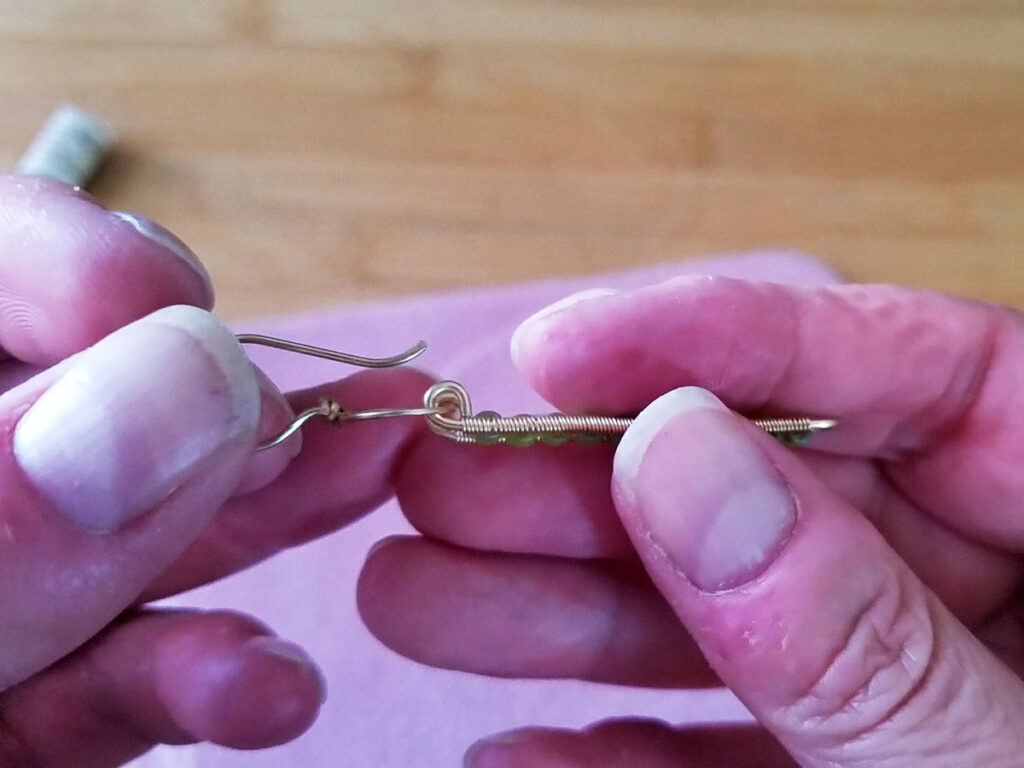
There are lots of ways that you can add ear wires to these earrings, but my favorite way to make these earrings is to combine them with my Modern Big Loop Ear Wires. Use my free tutorial to make a pair of ear wires. Then carefully twist the loops on your beaded sticks open. Slide them onto the loop of your ear wires. Finally, twist the loops closed again.
Make sure you align the back of the ear wires with the back of the beaded frame, as shown.
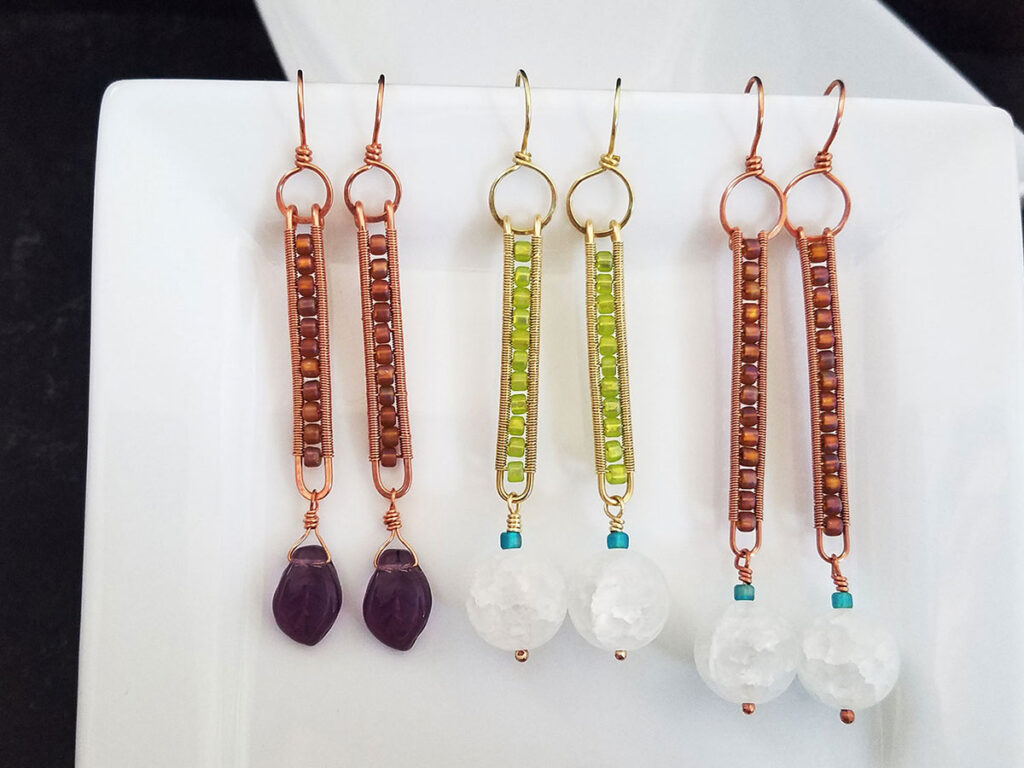
For a more minimalist look, you can leave your earrings as is. They’ll look similar to those pictured below. But if you want to add a pop of contrasting color and some extra swing, add the optional beaded dangle, as shown below.
Attach a Beaded Dangle
I prefer to use handmade headpins for my beaded dangles, and I currently have tutorials for two very simple headpin options. You can make simple loops, as I demonstrate in this video, or you can make balled end headpins, which I demonstrate in this video.
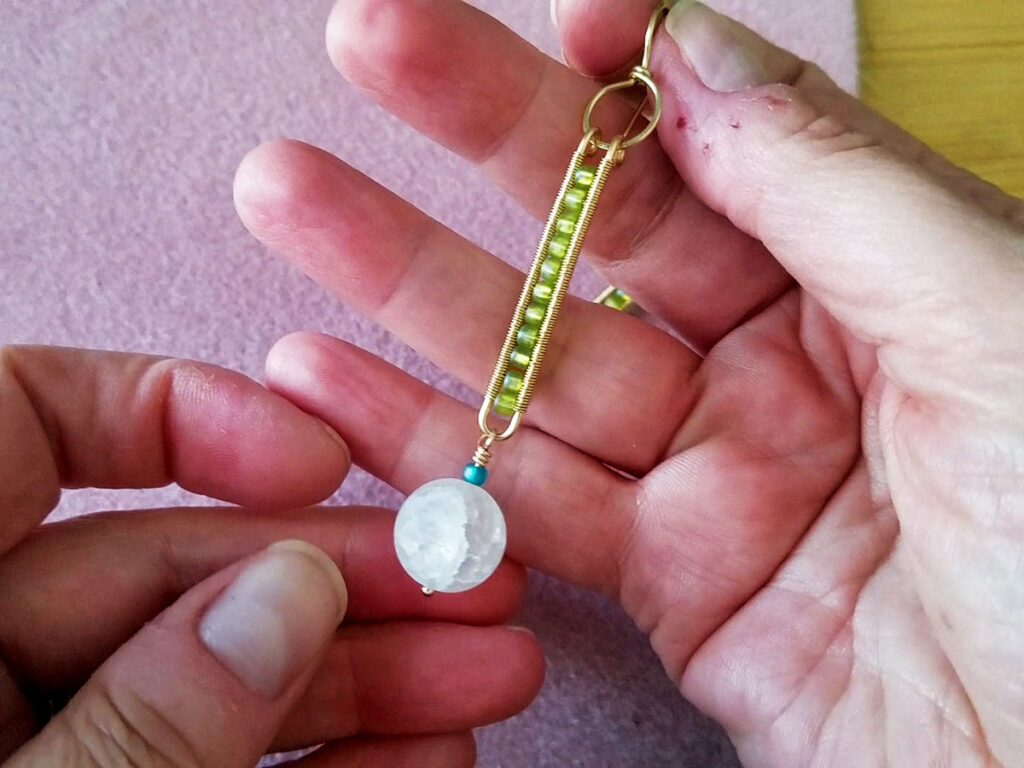
Cut two pieces of 22g wire to 3 inches and form your preferred head pin style. Slide your large accent bead onto the head pin and, if desired, add another 8/0 seed bead in a color that contrasts with your beaded sticks.
Finally, use the tip of your chain nose pliers to create about a 45-degree angle on your wire just above your beads, then use the 2mm step (the smallest step) of your bail-making pliers to create the loop. Attach the loop to the bottom of your beaded stick and secure the loop with three neat wraps.
Need help understanding how to secure beaded dangles with wrapped loops? I demonstrate that process here.
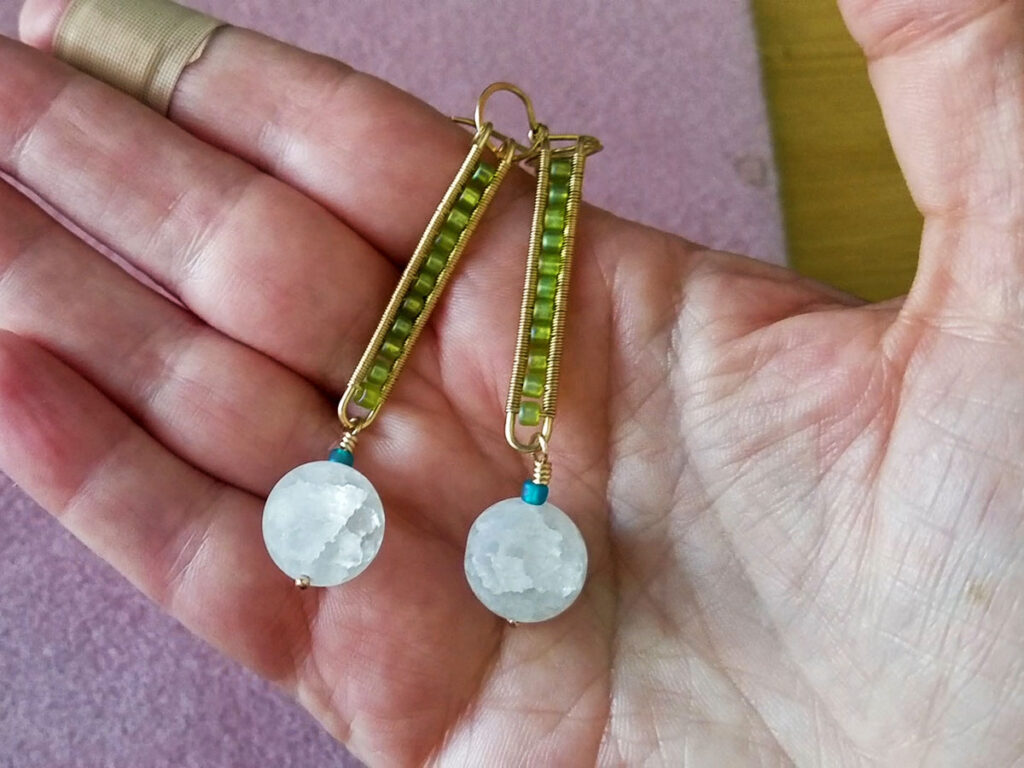
When finished, your earrings will look similar to those pictured here. Notice that I used balled end headpins on these earrings. I think the balled ends make for a cleaner finish on this more modern earring design.
Variations of the Modern Stick Earrings
These earrings are super versatile and simple to customize to your tastes. You can change up these earrings by simply changing the size, or even the shape, of the loops on your ear wires. Try making diamond-shaped loops, for instance. Or make larger loops for bold, graphic statement earrings.
Again, you can choose to make these earrings with or without the beaded dangles. If you decide to skip the beaded dangle, play with the length of your sticks. Try increasing the length to make beautiful minimalist shoulder dusters.
Finally, you can drastically change the look of these earrings by choosing different sizes and shapes of beads for the optional beaded dangles. There are no rules with these earrings. I’ve deliberately designed them so you can customize to your heart’s content. So, have fun playing with this design!
Finishing Your Easy Modern Stick Earrings
I chose a bright finish for these earrings because I love the look of the bright, high-polished brass. To get a similar finish, wash your earrings thoroughly with warm water and a mild dish soap to remove any oils from your fingers. Then toss them in your tumbler for a few hours to give them a high shine finish. Or simply polish them by hand with a Sunshine polishing cloth and/or a pro polish pad. Easy peasy!
Discover More Behind Door 44
Thanks so much for joining me today. I hope you enjoyed creating these easy modern stick earrings. If you’d like a much more detailed printable PDF version of this tutorial with load more tips and tricks, it’s coming soon. And my email subscribers are always the first to know whenever I release a new tutorial. So, join my list now if you’re not already on it!
Want to keep up with what’s happening behind Door 44?
Want more free wire jewelry tips and tricks?
I like to share useful wire weaving tips and tricks on my social media channels, and we have some great conversations about wire jewelry in my private Facebook Group. Also, be sure to connect with me @door44studios on Instagram, and Facebook to keep up with everything that’s happening behind Door 44. And if you haven’t already done so, be sure to subscribe to my YouTube channel where you’ll find new wire jewelry videos weekly.
Until next time, go make something beautiful!